
Final Project
Planning Your Site with AI
What is AI-Assisted Web Design?
What Webflow AI does
- Generates a complete site layout from a text prompt
- Creates page structure and section layout
- Applies a general theme based on subject and tone
- Produces placeholder content and imagery
What Webflow AI consistently gets wrong
- Colors — ignores or misapplies your hex codes even when specified
- Fonts — substitutes its own choices even when you name specific fonts
- Navigation — generates mega menus for 3-page sites
- Accessibility — missing alt text, contrast failures, broken heading structure
- Content — fills pages with generic placeholder text
Your role
- Give the AI specific, short, well-planned direction
- Evaluate what it generates critically
- Fix what it got wrong — manually and deliberately
- Part 2 is where most of your grade lives
Prompt Length Matters
Webflow AI is not your regular AI chat. It does not process long paragraphs the way a conversational AI does. Shorter, more specific prompts produce better results.
What the prompt controls
- Number of pages and their names
- Section structure and layout
- Subject and overall theme
- Tone and general feel
What you fix manually in Part 2
- Colors applied in the Style panel
- Fonts added in Site Settings, then applied per element
- Content copied from Step 5 into each section
- Navigation simplified to match your actual pages
- Footer cleaned up and matched to your palette
Prompt tips
- Keep it under 100 words
- List hex codes in a plain row with no labels: #1C2B3A #8B6F47 #C9A84C #F5F0E8
- Each section of the homepage on its own line
- Don't repeat information. List pages only once
The 7-Step Planning Workflow
Complete all 8 steps in AI before you open Webflow. Each step builds on the last. By Step 8 you have everything you need to write a strong prompt.
- Step 1 Define the site, audience, and brand voice
- Step 2 Identify target keywords
- Step 3 Plan the structure (pages + sections)
- Step 4 Plan the layout (section by section)
- Step 5 Generate the content
- Step 6 Choose a color palette (hex codes)
- Step 7 Choose a font pairing (names + sizes)
Then
- Assemble your Webflow prompt from Steps 1–7
- Open Webflow and generate
- Document your prompts as you go.
Steps 1 & 2 — Audience, Voice & Keywords
Step 1 — Audience & Brand Voice
I'm building a simple 3-page website about Sherlock Holmes. Who would visit this site and what would they be looking for? Based on that audience, also suggest 2–3 words that describe the brand voice and tone the site should have.
This gives you your audience profile and your brand voice words in one step. The voice words go directly into your Webflow prompt at the end — make sure you can find them in your response before moving on.
Step 2 — Target Keywords
Send this prompt (same conversation):
Based on that audience, suggest 5 to 8 keywords or phrases my content should naturally include. Explain why each one is relevant.
These keywords feed into your content in Step 5. Save them — you will paste them directly into a later prompt.
Brand Voice and Tone
Brand voice is the personality behind everything your site says. It came out of Step 1 — 2–3 words like intelligent and atmospheric, or warm and approachable, or bold and minimal. Those words go into your Webflow prompt and guide your content choices in Part 2.
Voice vs. Tone
- Voice is consistent — it's the personality of the site across all pages
- Tone can adjust slightly — more formal on the about page, more conversational in a blog post
- Both should be visible in the content you generated in Step 5
- The 404 page in Part 2 is your best opportunity to demonstrate voice — it's the one page you build from scratch
Compare these examples
- Califia Farms vs. Oatly
- Vice vs. Buzzfeed
- Rosetta Stone vs. Duolingo
Same subject matter, very different voice. Notice how color, typography, and copy work together to create a consistent personality.
Keywords — Good Use vs. Keyword Stuffing
Keywords are the words and phrases people type into search engines when looking for content like yours. Use them naturally — not repeatedly or out of context.
Good
- Title: Fresh Organic Bread | Sunny's Organic Bakery
- Meta: Savor fresh, organic bread baked daily at Sunny's Organic Bakery. Whole grain, gluten-free, and artisanal breads.
- Content: At Sunny's Organic Bakery, our passion for baking shines through in every loaf of organic bread.
Keyword stuffing (avoid)
- Title: Bakery, Bread, Organic, Whole Grain, Gluten-Free
No context, no brand — confusing to users and penalized by search engines. - Meta: Best bakery, organic bread, gluten-free bread, whole grain, bread, bakery, organic.
Repetitive and unnatural — this is keyword stuffing. - Content: Our bakery offers organic bread because we are the best organic bread bakery.
Overuse kills readability and hurts rankings.
Steps 3 & 4 — Structure & Layout
Step 3 — Plan the structure
I'm building a 3-page website about Sherlock Holmes. What are the 3 most logical pages and what sections should each one contain? Keep it simple.
This is your sitemap. Review it — does it match the site you described in Steps 1 and 2? Adjust in your document if needed before moving on.
Step 4 — Plan the layout
Now give me a simple layout description for each page — what sections there are and how they are arranged.
This replaces the wireframe. Instead of drawing boxes, the AI describes the structure in words. You will pull the homepage sections directly from this response when writing your Webflow prompt.
Step 5 - Generate the Content
Generate placeholder content for all three pages. Use these target keywords naturally in the headings and body copy: [paste your keywords from Step 2].
This is the content you will copy into Webflow in Part 2. Real content from the start means you are not chasing placeholder text after the site is generated.
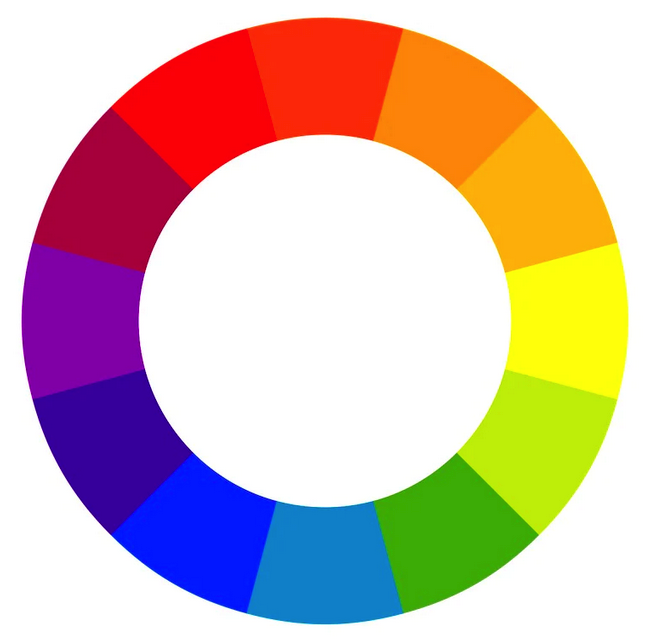
Step 6 — Color Palette
Color is one of the most powerful design elements on a website. Product assessment takes only 90 seconds — and between 60% and 90% of that judgment is based on color alone.
Send this prompt:
Suggest a color palette for a website about Sherlock Holmes. Give me 4 colors: a primary, a secondary, an accent, and a neutral background. Include the hex codes and explain why each color fits the subject.
Important
- In your Webflow prompt, list hex codes in a plain row with no labels:
#1C2B3A #8B6F47 #C9A84C #F5F0E8 - Labels like "Primary —" confuse Webflow AI
- Colors are applied manually in Part 2 — not through the prompt alone
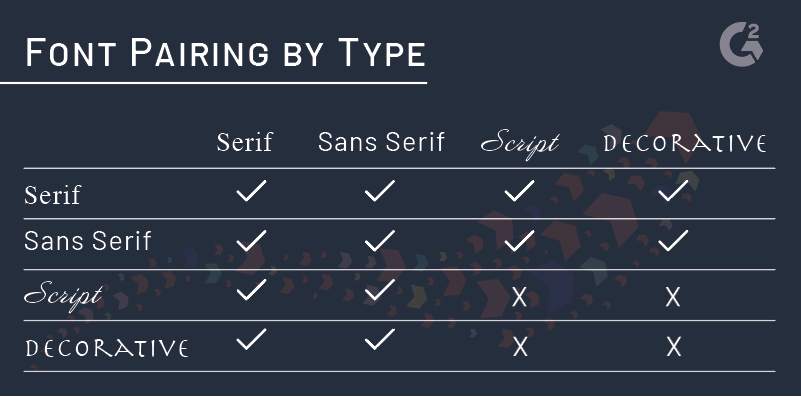
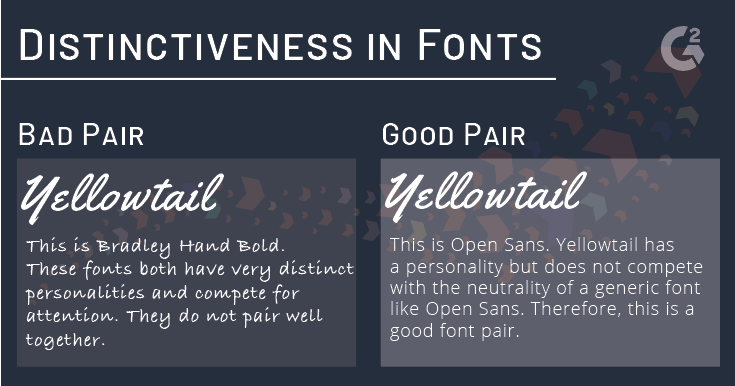
Step 7 — Font Pairing
Send this prompt:
Suggest a Google Fonts pairing for a Sherlock Holmes website. Give me one font for headings and one for body text. Explain why they work together and tell me what sizes to use for H1, H2, and body text.
What to record
- Font names for headings and body
- Recommended sizes for H1, H2, and body
- Screenshot both fonts from fonts.google.com
Like colors, fonts are applied manually in Part 2 via Site Settings → Fonts, then the Style panel.
The Call to Action

- Download
- Contact
- Like, Share
- Learn More
- Watch a video
- Subscribe
- Buy
Be clear on what you want people to do. Use action words.
Your CTA goes into the Webflow prompt and into the content from Step 5. It also appears on your 404 page in Part 2 — bringing the visitor back to your homepage is itself a call to action.
Assembling Your Webflow Prompt
At the end of the 8 steps you have everything you need. Fill in this template — keep it under 100 words.
The template
Create a [number]-page [type of site] about [subject]. Pages: [page names — Step 3]. Homepage sections: [sections — Step 4]. Hero tagline: [your tagline — optional] Hero CTA: [your CTA button text — optional] Fonts: [heading font — Step 8] for headings, [body font — Step 8] for body. Colors: [hex codes — Step 7, no labels]. Tone: [brand voice — Step 1].
Sherlock Holmes example
Create a 3-page reference site about Sherlock Holmes. Pages: Home, The Stories, Adaptations. Homepage sections: full-width dark hero, short summary block, three-column card grid, full-width pull quote. Hero tagline: "The World's Most Famous Detective Lives at 221B Baker Street." Hero CTA: "Start Exploring." Fonts: Playfair Display for headings, Source Serif Pro for body. Colors: #1C2B3A #8B6F47 #C9A84C #F5F0E8. Tone: intelligent, atmospheric, approachable.